I actually use paint shop. I'm just never
bothered to invest the time to learn photoshop.
theredhood had the basic idea. You just scan
different parts of the cel and then copy & paste
them together. It's very difficult to do this if
the cel or background does not have one flat edge
to align the different parts on the scanner bed.
For most cels, I usually scan at 400-600 dpi and
then shrink the image. For cels that require
more than one swipe on the scanner, I won't
shrink the image until I copy and pasted all the
parts together. These scans do get very large,
so a machine with lots of ram is very handy. I
prefer to shrink large scans (instead of just
scanning directly to a certain size) since it
gives a more accurate representation of the cel
and hardly requires any touch-ups. Also, it
helps to correct inconsistancies (like small
light changes that cause the appearance of
contrast bars). In addition, less than perfect
alignments disappear more easily when shrinking a
large image.
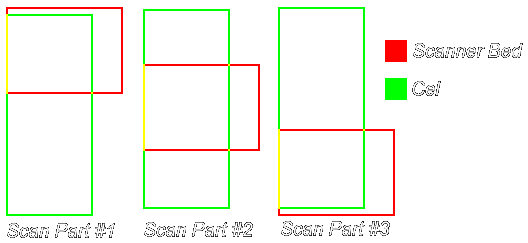
Here's what I did for the Mayuka cel. My scanner
bed has an area of 8.5 x 11.5". The Mayuka cel
is 10.5" x 20". By placing the cel so that the
short edges are parallel to the scanner bed's
long edges, it will require 3 swipes: the top,
middle, and bottom part of the cel. Luckily, the
cel's long edges are flat, so it will be easy to
align scans. In this case, I just made sure that
only the cel's left long edge was flush against
the scanner bed's left short edge, and ignored
the alignment of the other sides of the cel.
Next, I just positioned the cel over the scanner
bed and took a scan for each of the 3 parts. I
then cropped each part so that there is little
overlap between the parts. (It's important to
crop the edges for non-BG cels because of
shadows). When copy & pasting large scans
together, make sure your machine has lots of ram;
otherwise, it may freeze during a copy & paste
(and lose your scans; so save the scan parts
before doing this; if necessary, scan at a lower
dpi). Before copy & pasting one scan part into
another, make sure you enlarge the image area
beforehand. Alignment of the different scan
parts will take a while for a large image, so try
not to hurry. It's ok if the alignment isn't
perfect since shrinking a very large image will
help make it less or even unnoticeable. For a 3
part scan, you'll have to do this twice.
Afterwards, I cropped any extraneous garbage
around the scan and shrinked it. My combined
scan was over 9000 pixels tall before I shrinked
it to 1525 pixels (yeah, I have lots of ram).
That degree of shrinking is probably why you
can't see where I fused the different parts
together (and why I don't have to do any touchups
like sharpening).
I'd say my scans are pretty decent for a ~$80
scanner, heh. Later. |