I know some people get annoyed seeing little
specks of paint missing from the tips of hair on
their cels (hair paint) only to find the missing
paint specks on the accompanying sketches. I
decided to try to do something about it and was
successful at transferring a paint speck that was
stuck on a sketch back to the cel. I forgot to
keep the 'before' scan, though.
I tried it again this morning on a different cel
setup and remembered to do both before & after
scans.
As a little reminder, this is not something you
should attempt if you have shaky or nervous hands
and without prior practice on cheap cels. (those
freebies are good for something)
By the way, the paint specks I've tried putting
back onto cels are only like 1-3 mm in length and
width, so very nimble hands and excellent
eyesight are a must.
This is basically what I did:
1) dab some water on the opposite side of the
paper of the stuck paint speck (obviously, you
want to minimize the amount of water used on
matching sketches or sketches that you like)
2) using a razor (hobby knives work great),
carefully pick away at the area surrounding the
paint speck and try to get the blade underneath
the paint speck. As long as enough water was
used, the paint speck should come off without
removing paper fibers.
3) carefully let the paint speck dry on the razor
blade. Do not blow on the paint speck to dry
it. (you'll just blow it away never to be seen
again)
4) while the paint speck is drying, cut open a
cel bag (NOT mylar since mylar will have a
greater attraction for the paint speck than the
cel) so that it's open on 3 sides (kinda like a
book). Open up the cel bag and put down the cel
in question on one side of the cut-up cel bag.
Don't cover up the cel with the other side of the
cut-up bag yet.
4) carefully set the paint speck down on the cel.
Get a dull, pointy, object that won't generate
static cling (like a pen cap) and orient the
paint speck back into its original position on
the cel. This may take a loooong time to do.
The paint speck may be a little shriveled, but
this is ok. The next step will fix that.
5) Now cover the cel with the other side of the
cut-up bag and press down on the area with the
paint speck. If the paint speck was a little
shriveled, this will flatten it out. If
necessary, open up the cut-up bag again and
readjust the newly flattened out paint speck.
6) With cut-up cel bag covering the paint speck,
apply pressure for a minute or two.
7) Place cel setup between two pieces of
cardboard, put paperweight on top, and set under
bed for at least a week. After a week or so, the
paint speck should have full adhered back onto
the cel.
I've tried this twice on my non-freebie cels and
was successful twice. At the worst, one will
probably just lose the paint speck.
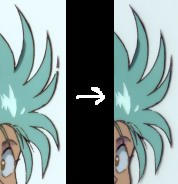
The picture on the left has a L-shaped paint
speck missing on the hair. The missing speck of
paint was on the sketch. The paint speck is now
off the sketch and back onto the cel in the right
pic.
Of course, a lot of people don't care about one
missing speck of paint on a cel, but missing hair
paint just irks me, heh. |